The Make Waves kit is wonderful, the colours of the papers and the embellishments are fantastic. It's is a mermaid theme but don't be fooled you can use these papers and compliments for any number of different projects. I have used some of the papers and this wonderful stamp set in my projects.
A few friends and I decided on a High Tea for our Christmas get together and I have created a layout with these photos. Who would have thought these papers could be used for A Christmas layout? I have used the pale pink, and the shaded green papers with one of the Zip Strips. To decorate the page I used the Christmas tree and reindeer stamps from the Beary Christmas stamps and thin cuts set Z4047. This set is still available in the Going Soon section of my website.
I stamped the trees on vellum with Vesamark ink and then heat embossed with white embossing powder. The reindeer was also stamped on vellum then heat embossed with the gold embossing powder. I coloured the baubles on the tree with a Shin Han Marker.
My tea setting was so pretty, I thought I would replicated it using last year's May Stamp of the Month and the sentiment was perfect for these photos as well.
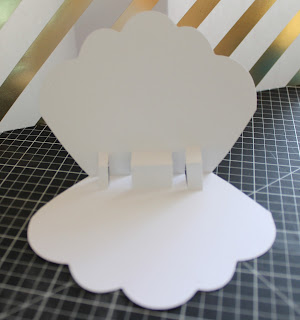
I am thrilled with how this card turned out, I saw a similar party invitation in an Etsy Shop online and couldn't wait to try making it as a birthday card. I cut the card using a shape from the Artiste Cricut cartridge, it's on page 33 (Accent 4) The Lagoon cardstock was cut at 6.25" and the white at 6" The mermaid is cut out from the mermaid paper. The mermaid stamp was too big for this card. The little sparkly flower embellishments are the cutest things I have ever seen.
To make the card fold the cricut shape in half, you will need to cut away sections of the card to get the clam shell shape. I have drawn lines on the photo below so you can see what I mean.
These photos show the pop up sections that I added the mermaid, flowers, starfish and grasses to.
This card is called a Z fold card and is really easy to make. I used one of the cards from the Card and Envelope Value Pack X254. The front of the card is folded back on it's self then you decorate as desired. Finally add the Z fold strip, this strip allows you to add extra decorations.


The clam shell card is adorable - I need to case this idea I think its fabulous. Thanks for sharing how you created it.
ReplyDeleteI love the Z fold too and would never have thought to use Make Waves for a Christmas Layout but it looks amazing.
Thanks Maz
DeleteOoh! That clam shell card is amazing! Clever girl!
ReplyDeleteI want a clamshell card! :O
ReplyDeleteThanks Kara
DeleteThanks Nel, the clam shell card was fun to make
ReplyDeleteLove the creativity!! I will definitely have to CASE that clamshell card - thanks for the details on how you made it!
ReplyDeleteThanks for taking a moment to comment it is appreciated.
DeleteThe clam shell card is the cutest thing ever!! I loved it and pinned it immediately when I saw it last week. Only finally got back on to comment.
ReplyDeleteThanks Vandra, you are very kind.
DeleteLove your cards!
ReplyDeleteThanks Lolis, I appreciate your comment.
DeleteDoris, I just now saw you card on Pinterest and clicked the link to this page.....just LOVE the mermaid card....so really nice of you to give details on creating. Thank You! My granddaughter will love it!
ReplyDeleteThank you very much for taking the time to leave a comment.
ReplyDelete